Practical Optics 1 - Testing Different Sensor Sizes
Test images with a still camera to show how camera position, sensor size, focal length and angle of view interact to create the distinctive look of different sensor sizes.

This post examines how camera position, sensor size, focal length and angle of view interact to contribute to the distinctive look of various formats.
This post is an expanded version of my print article in the April issue of American Cinematographer, with modified illustrations. The web enables me to present the images in larger size than print, allowing you to grasp nuances you might not see on the printed page.
This is the first in a series of introductory pieces about "practical optics".
I must start with a disclaimer: I am by no means an expert on optics. I am merely a student of optics, and my goal is to explore practical optics by shooting simple tests that can be shared with fellow students.
+++
1. The Subject: Perspective and Sensors
There is a current trend toward shooting with sensors larger than the Super 35mm standard, with cameras such as the Red Dragon and the Arri Alexa 65. The goal of the tests presented here is to explore how a different sensor size might change the look of a given composition, and in particular its perspective and depth of field.
The idea was to devise a testing approach that students can easily replicate to reproduce our results and perhaps continue their own research. To keep things simple, we used a single full-frame camera and then framed for cropped images within that full frame to emulate two smaller sensors. We also used a single zoom to get different focal lengths. Thus you should be able to replicate these tests with any full-frame camera and zoom.
+++
2. The Team
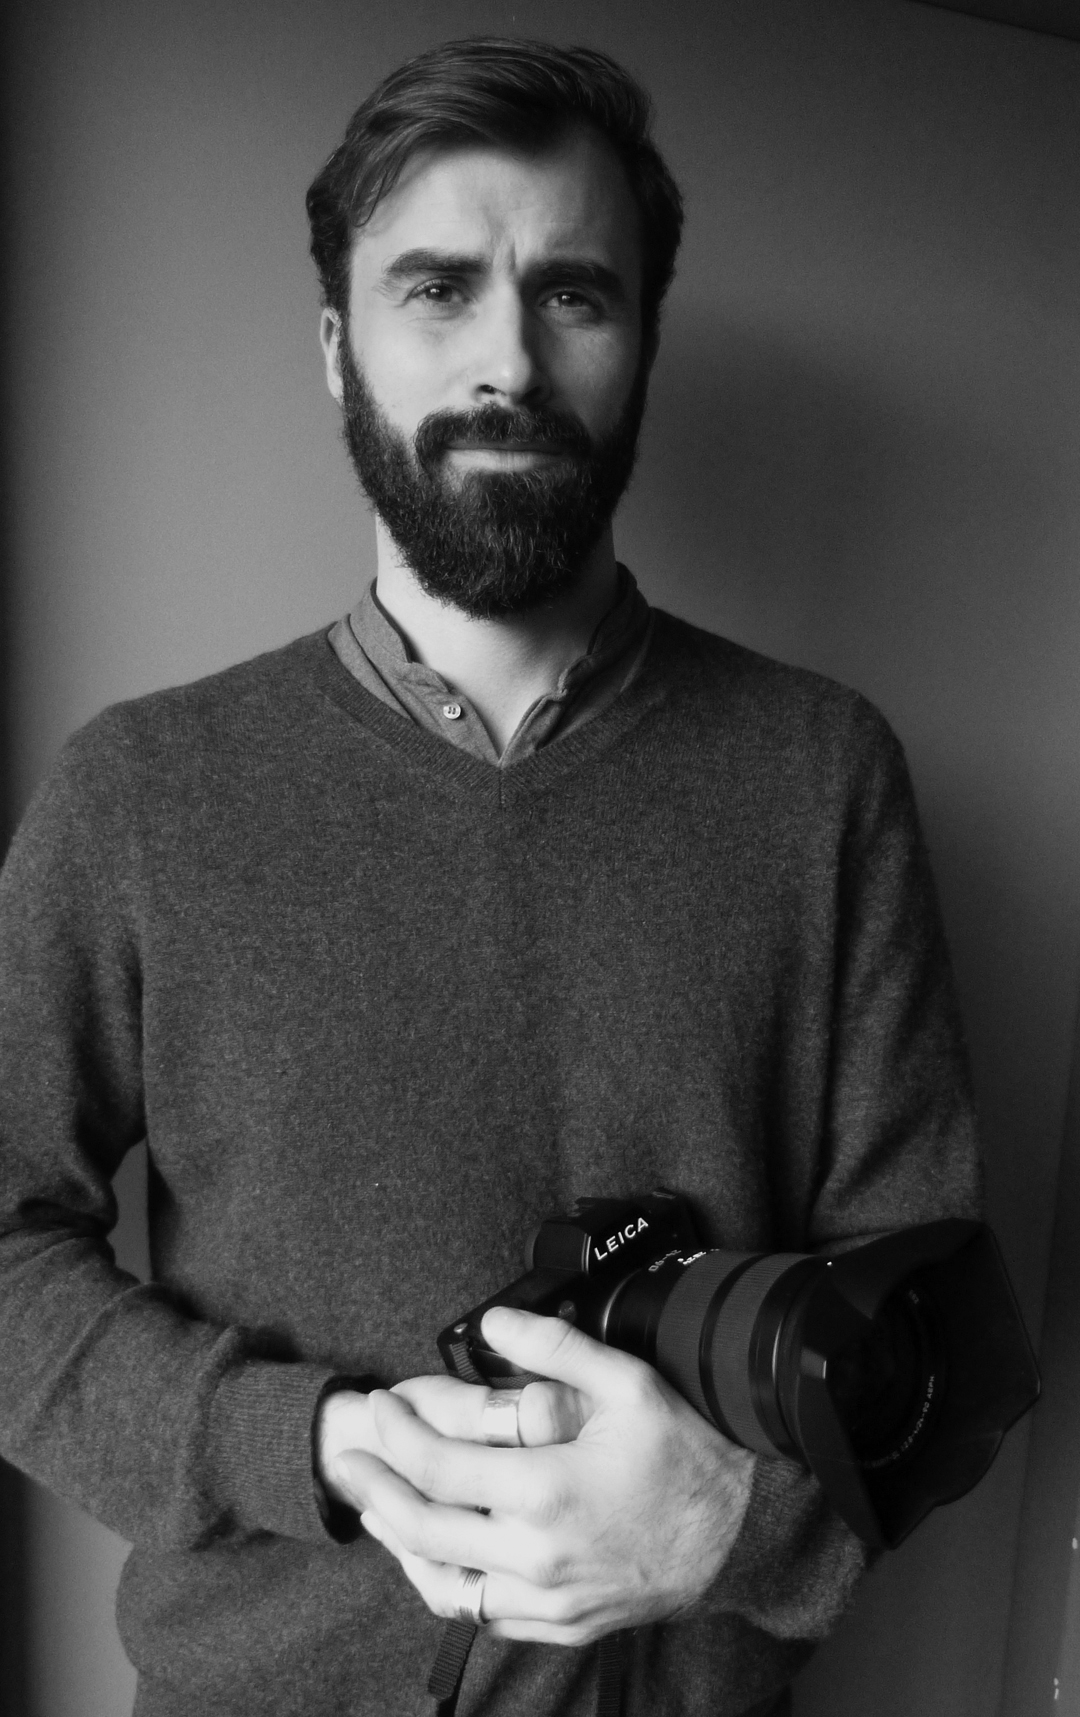
I shot the tests with the help of Pierre-Hugues Galien, AFC, a cinematographer who has shot several noteworthy features, including Now or Never by Serge Frydman, Too Close to the Sun by Yves Angelo and Dad in Training by Cyril Gelblat.
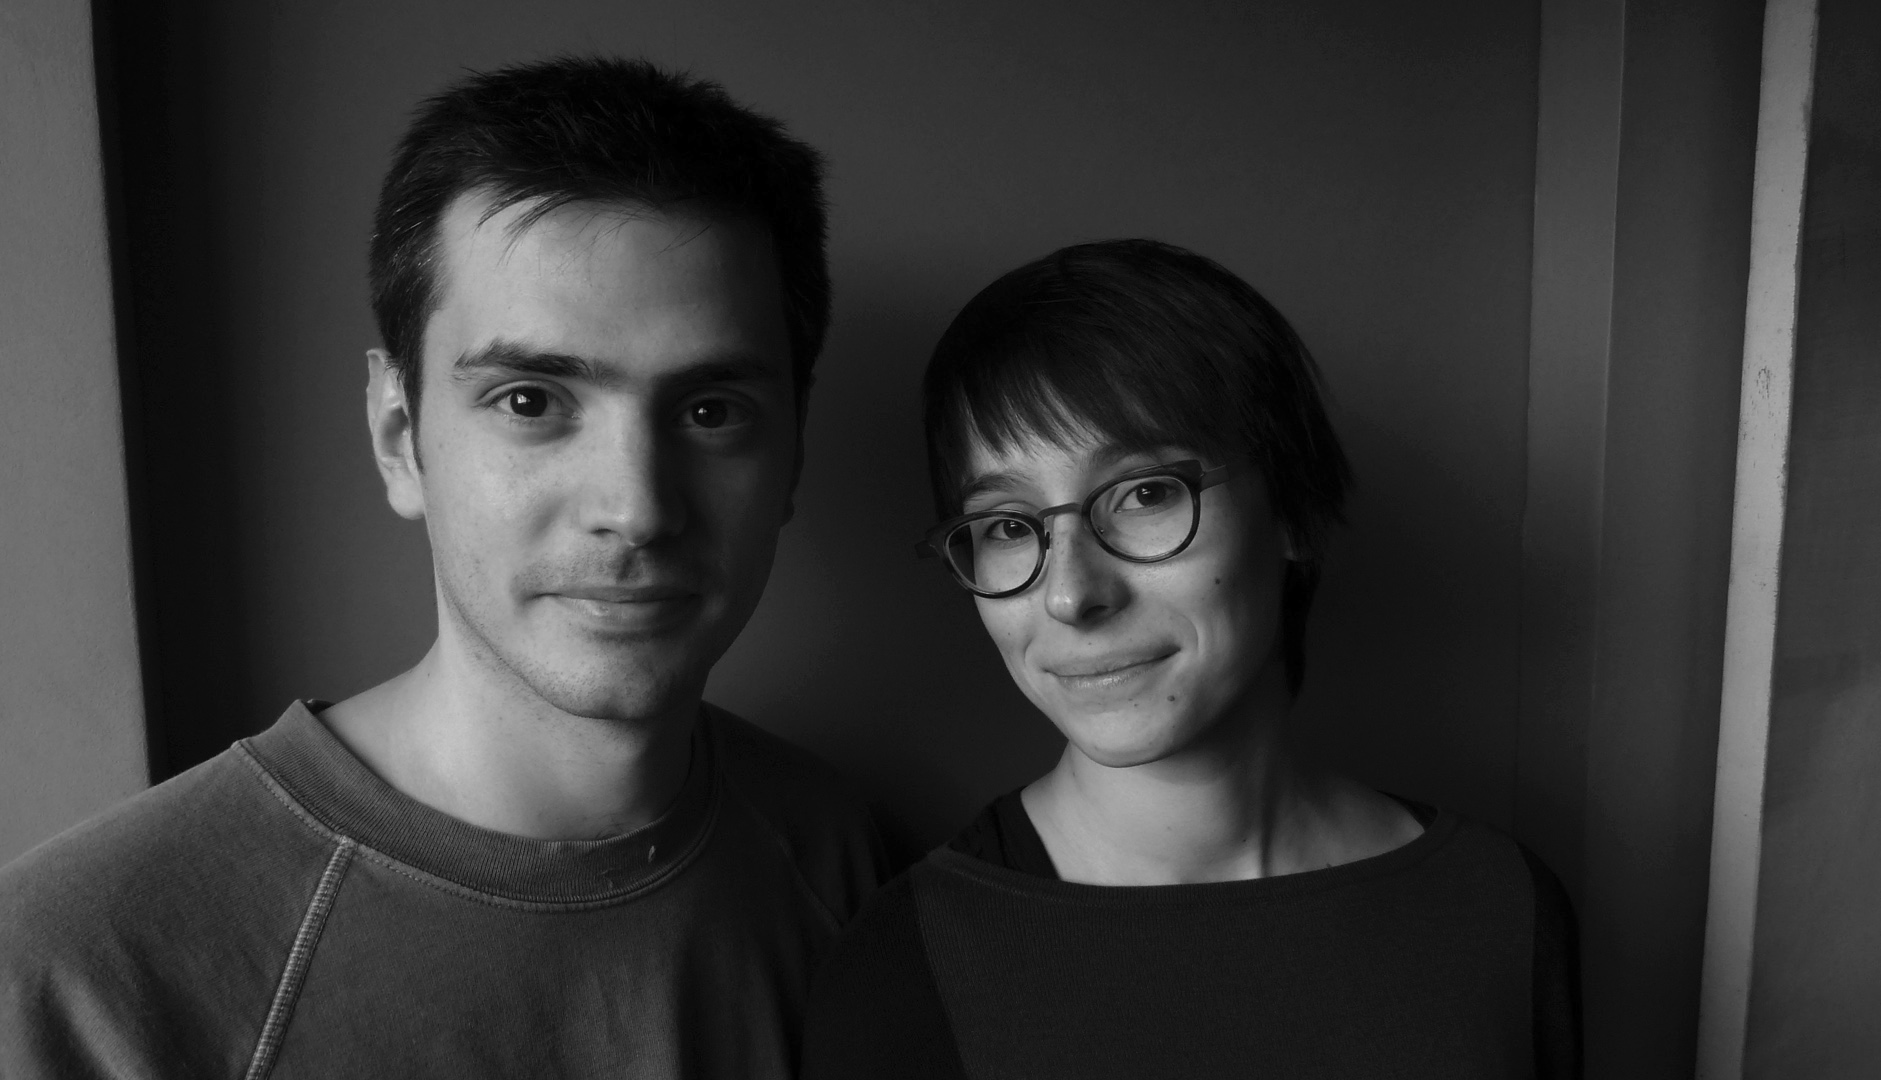
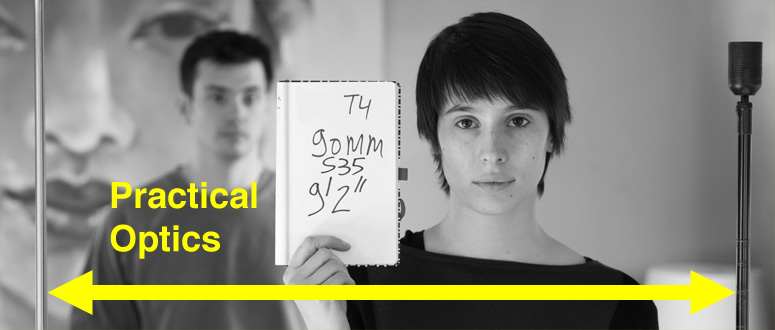
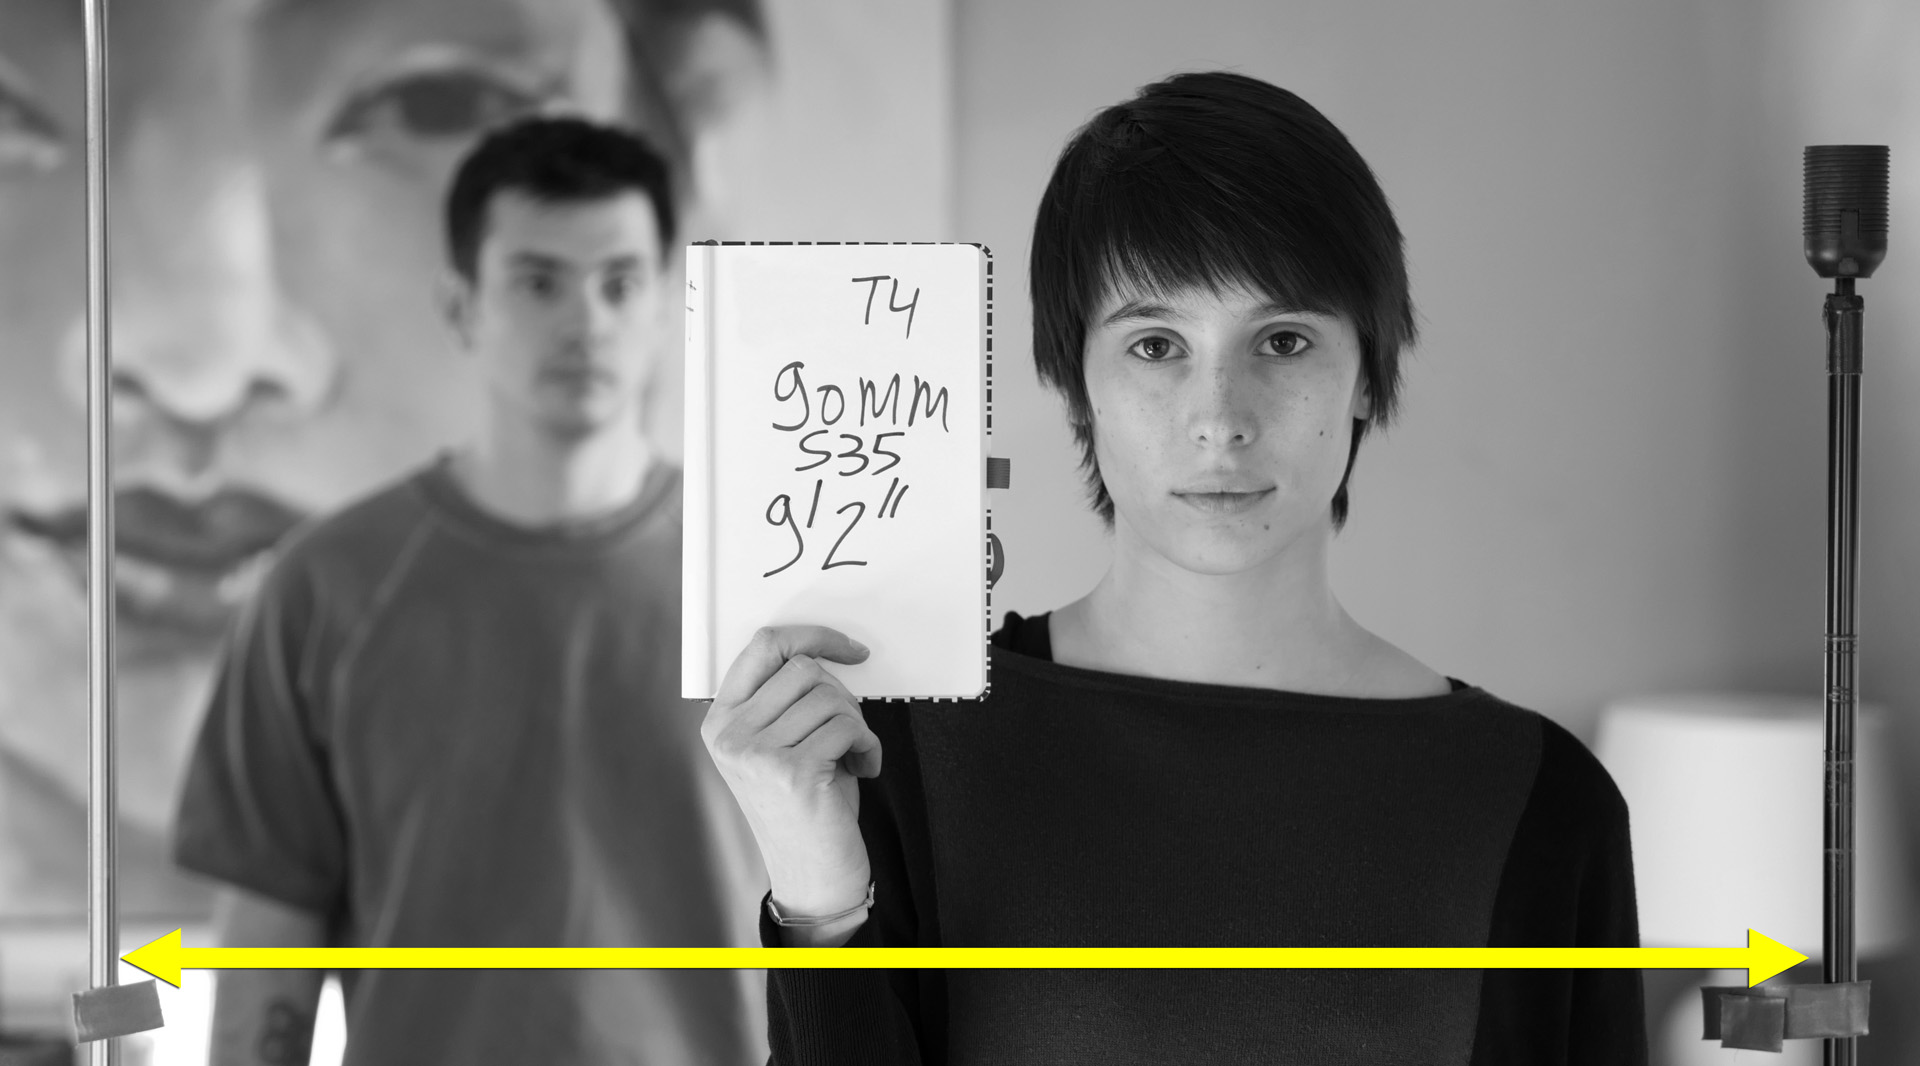
Two crew members kindly agreed to act as models: Marion Delahousse, a camera assistant, and Kevin Felix-Lassa, a student at the 3IS film school (International Institute of Image and Sound) near Paris. In the tests, Marion was in the foreground, and Kevin was 6’ behind her. Farther behind on the wall, we placed another “face,” a giant painting by my friend Siew Ying Chong.
+++
3. Three Sensor Sizes
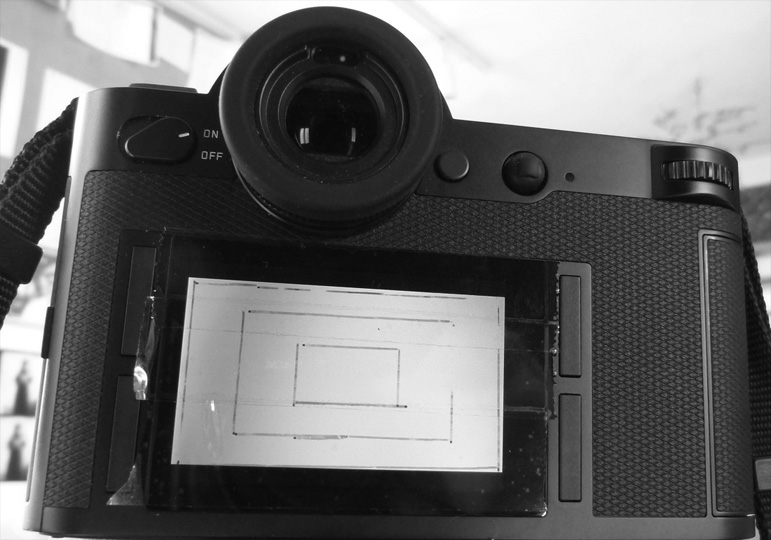
Pierre-Hugues recommended using a Leica SL. The camera’s full-frame sensor measures 36mm horizontal — about halfway between the 6K Red Dragon (30.7mm) and Red’s upcoming 8K Weapon (40.96mm). One day I hope to shoot tests with the Alexa 65 (54.1mm horizontal), which would require shooting with large-format lenses. It’s worth noting that the jump from Super 16mm to Super 35 in our tests is analogous to the jump from Super 35 to 65mm.
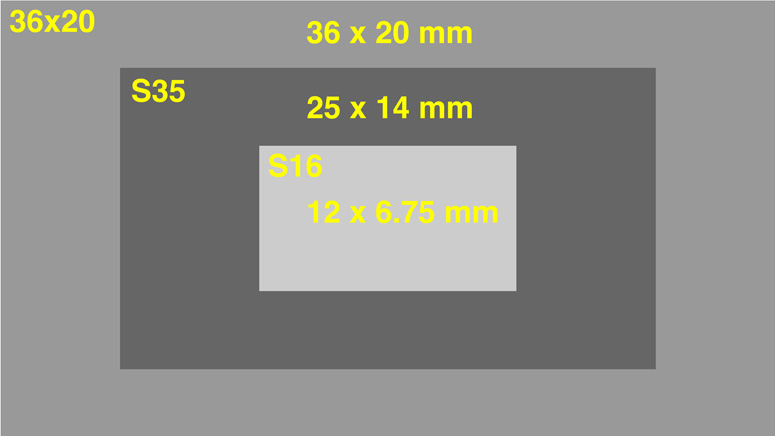
In our tests, one camera is used to emulate three sensor sizes with a 1.78:1 ratio:
A. Full frame 1.78:1 — 36mm x 20mm
The largest size uses the maximum width of the Leica SL’s full-frame sensor, which measures 36mm x 24mm — the standard “full-frame” for still photographs and cameras like the Canon EOS 5D. (On a historical note, 36mm is also the width of the VistaVision frame used by Paramount filmmakers in the 1950s, and notably by Alfred Hitchcock for Vertigo).
B. 3-Perf Super 35mm — 25mm x 14mm
At present, Super 35 is the standard sensor size for spherical features. We used the dimensions of AbelCine’s helpful “35mm Digital Sensor Comparison Chart” (see links below).
C. Super 16mm — 11.95mm x 6.72mm
As a reference for a small sensor, we chose the Super 16mm dimensions defined by Arri (see links below). When cropped to Super-16 size, the Leica image is close to HD resolution, which is still good enough for evaluating perspective.
We made a test chart with Photoshop that displays the three sensor sizes relative to each other. We printed the chart, shot it, and then traced the frame lines on a piece of clear tape on the viewfinder monitor as a framing reference.

The Leica Vario-Elmarit-SL 24-90mm zoom we used has a maximum aperture of f4 at the long end. We therefore shot everything at f4, to keep the aperture constant, even though that implied more depth of field than T2.8 or T2.
+++
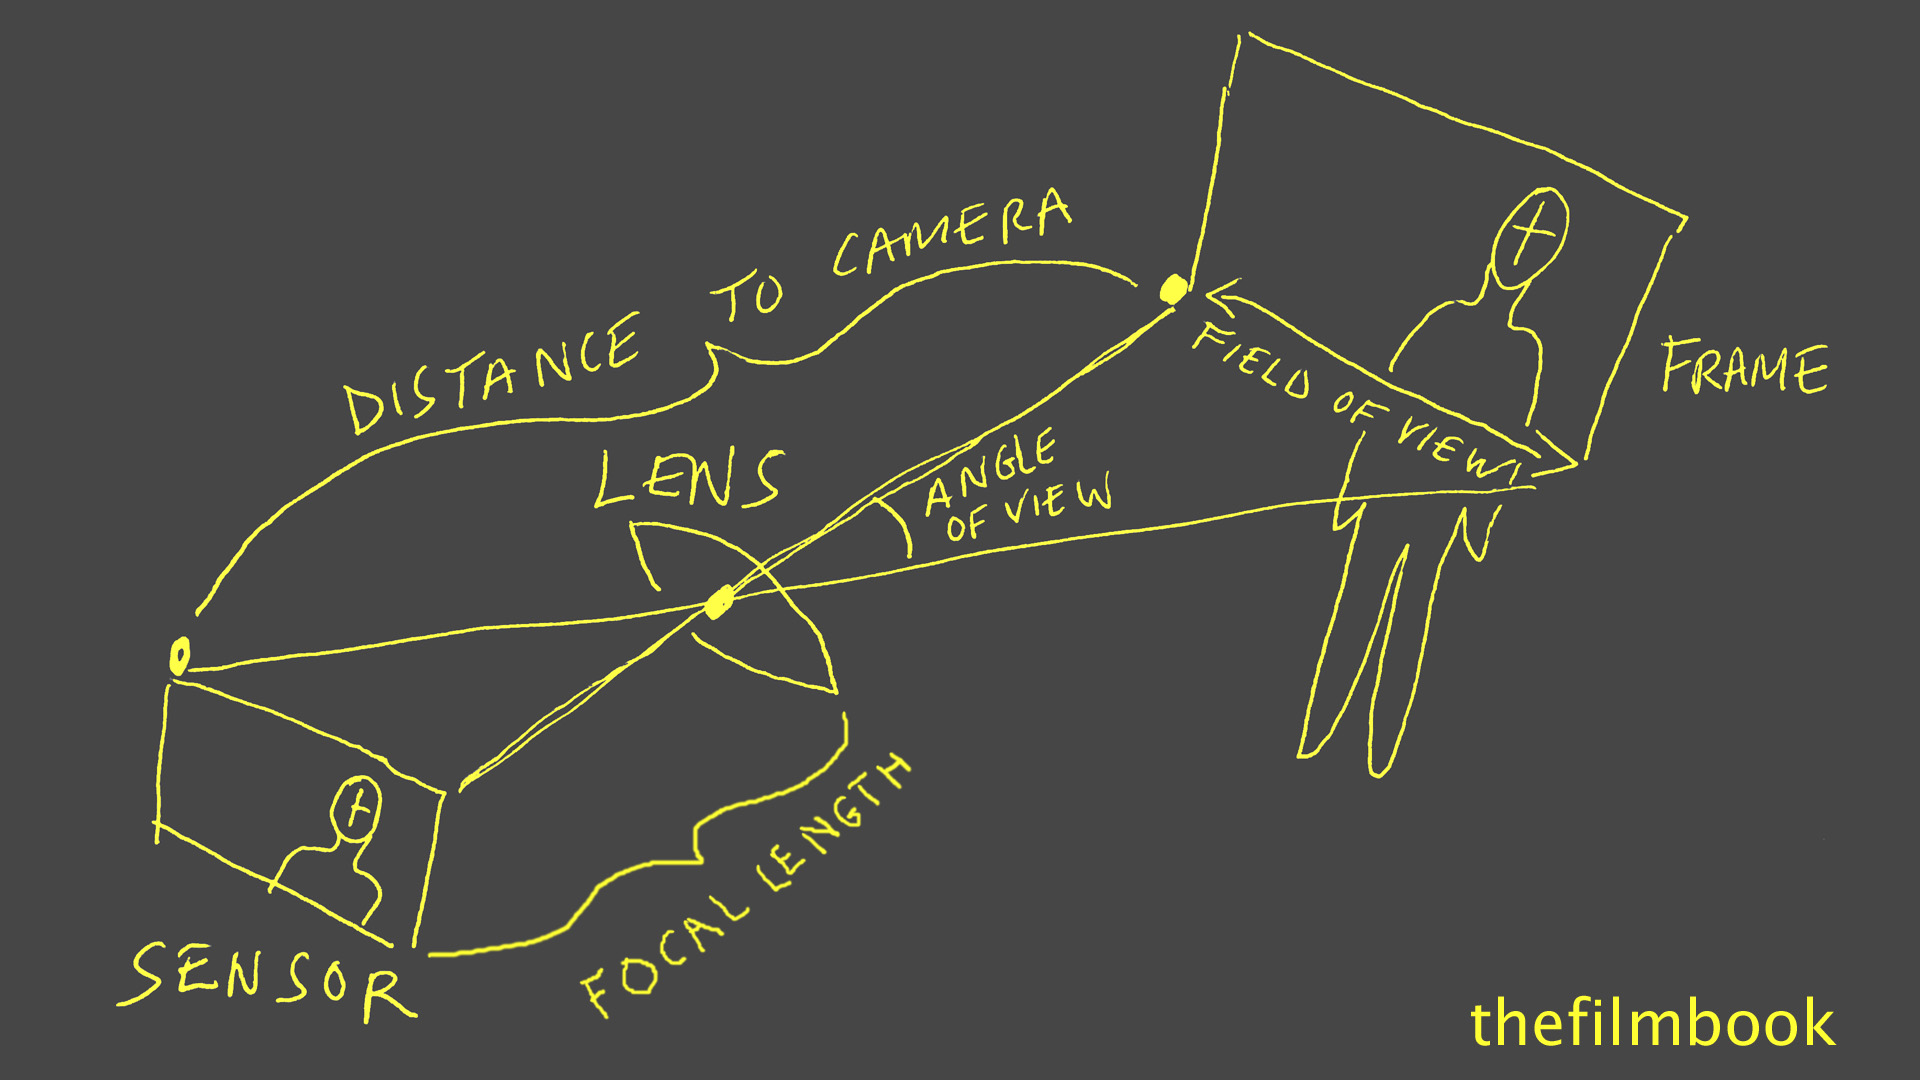
4. Angle of View and Field of View

Every focal length is defined by its angle of view from the camera position.
Short focal lengths have wide angles of view; long focal lengths have narrow ones. The field of view is the width (or height or diagonal) of the image at a given distance. There is a different field of view for every distance. For these tests, our reference is the horizontal field of view around the foreground person, Marion.
With a given sensor size, the angle of view never changes, while the field of view increases with distance. However, a focal length’s angle of view is different for different sensor sizes.
+++
5. Constant Field of View
In each of our five series of tests, we kept the same field of view at Marion’s distance from camera. Another way to think about it is to imagine Marion standing against a window shaped like the 1.78:1 frame; in each series of tests, the camera lens or position varied, but we always framed Marion in the same “window” — the same field of view around her. This means that Marion’s size and position in the five series of frames remains similar, even as we varied sensor size and focal length, or sensor size and camera distance.
+++
6. Same Distance, Different Lenses

At a fixed camera distance with the same focal length, the angle of view narrows as we go from 36x20 to Super 35 to Super 16, and so does the field of view at Marion’s position.
In our first test, we set the camera position 5’ away from Marion in the foreground, with Kevin about 6’ behind her. Then we zoomed out as we went to smaller sensor sizes so as to maintain the same field of view around Marion in the foreground, going from a focal length of 67mm in 36x20, to 48mm in Super 35, to 24mm in Super 16.
The most apparent difference when matching a composition between different formats at the same distance is that the longer lenses of the larger formats have less depth of field than the wider ones of the smaller formats. It’s also striking how identical the compositions at 5’ look: Kevin and the painting maintain the same size for the three focal lengths. I imagine that we would see more variation in the composition if we had shot at a closer distance to Marion, because the angles of view would be less aligned.
In this series, the Super 35 choice of 48mm is a medium focal length that evokes classic Hollywood, while 24mm is a more contemporary choice for a wide shot. To get a real understanding of the different looks in this range of focal lengths, you really need to see the camera or the people move, which would give a fuller illustration how the lenses render space.

+++
7. Larger Format, Less Depth of Field

The loss of focus on Kevin is somewhat subtle at f4, but it becomes more obvious when we go to longer lenses in our second series of tests, which compare a closer shot at 90mm in Super 35 with the same shot at 45mm in Super 16.
(click image for larger size)![]()
+++
8. Larger Formats Mean Longer Lenses
So the first takeaway from our tests is that when you need to keep the same distance, larger formats require longer lenses for similar compositions.
This is one reason many filmmakers compare 35mm anamorphic to 65mm. To achieve the same composition at a given distance in 65mm, you need to roughly double the focal length used in Super 35. This is comparable to the doubling of focal length when going from Super 35 spherical to 35mm anamorphic.
+++
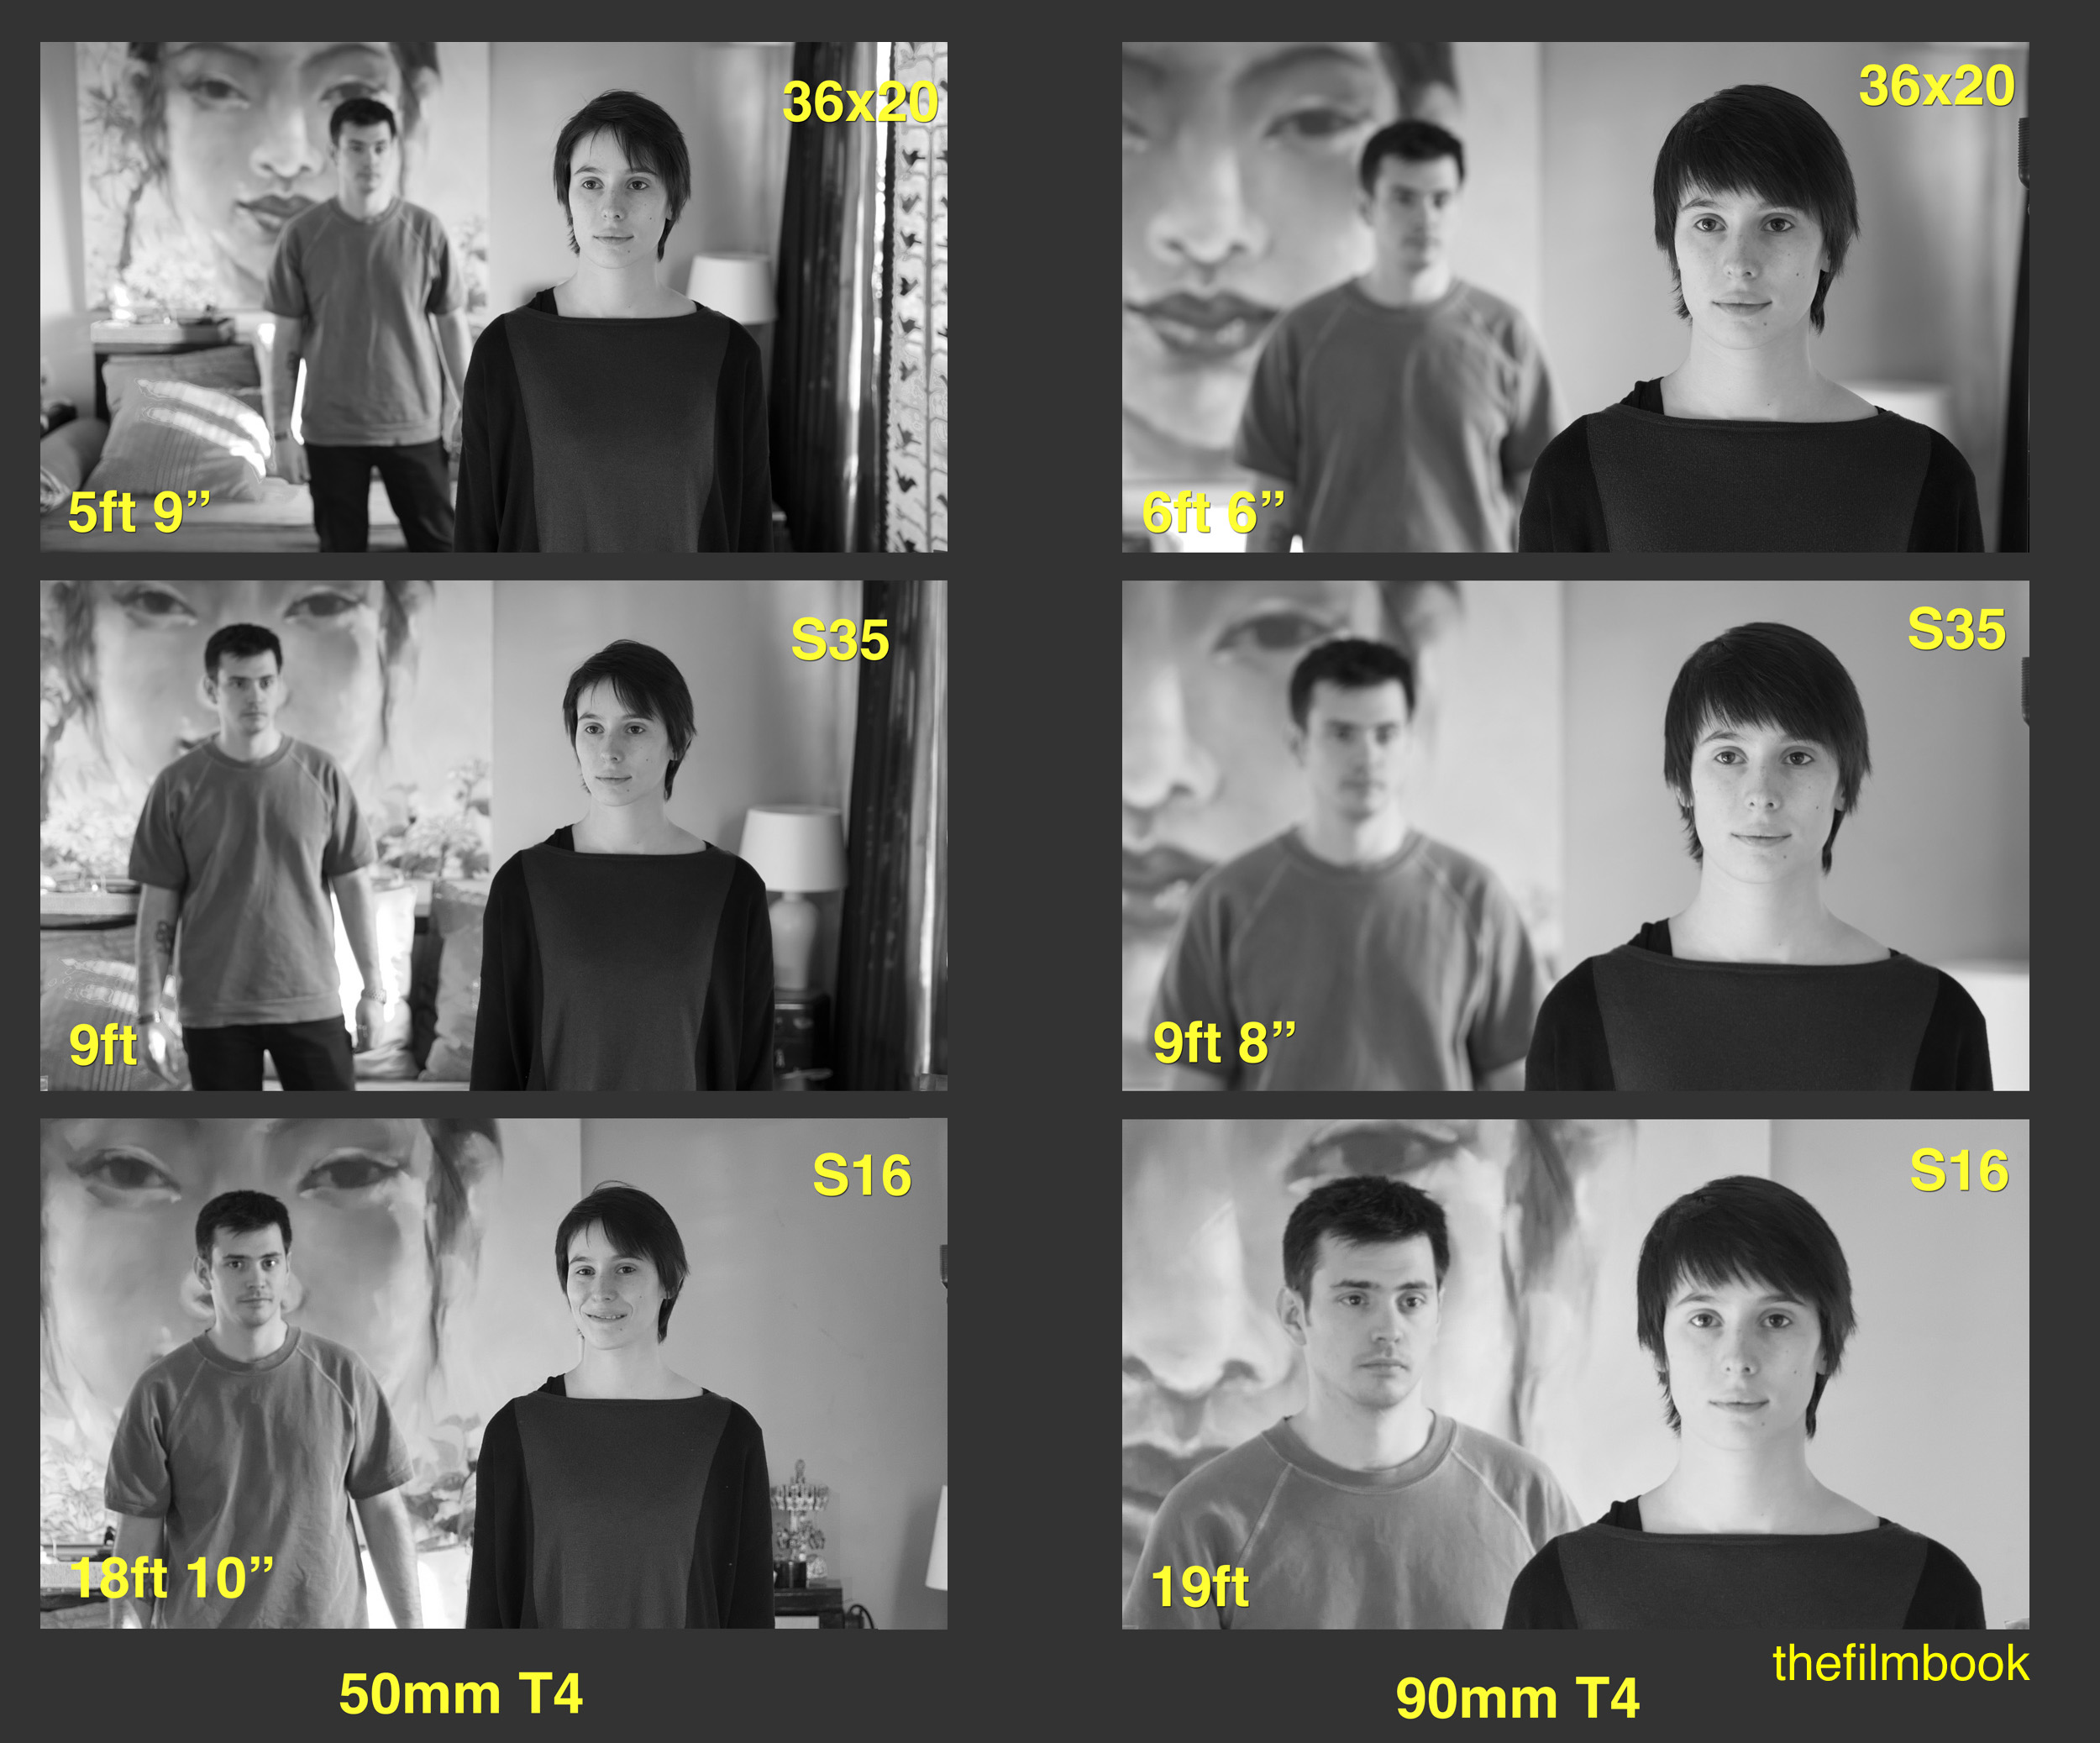
9. Same Lens, Different Distances

The next round of tests involved keeping the same focal length but changing the camera distance as we went to different sensor sizes in order to maintain the same field of view around Marion in the foreground.
Think again of the frame around Marion as a fixed window. As the camera moves farther away (as we go to smaller sensor sizes), Marion’s size in the “window frame” stays the same, but we see less of the background.
The field of view around Marion is the same, but the field of view around Kevin in the background narrows, making him bigger in the frame.![]()
+++
10. Magnification and Compression
It’s striking to see Kevin and the background painting increase in size with all three focal lengths as the camera gets farther away, while Marion stays the same in the foreground field of view.
Magnification is simply a matter of occupying more space in the frame. Longer focal lengths, like the 90mm, will have narrower angles of view than wider lenses, and will therefore decrease the fields of view and yield higher magnification.
Compression is linked to magnification, because objects appear closer as they increase in size. When Kevin occupies almost the same width in the frame as Marion, he appears to be very close to her. So the narrow angle of view of the 90mm will appear to compress the distance between Marion and Kevin more than the wider angle of view of the 50mm.
It’s important to note that magnification and compression are created by camera distance for all three focal lengths, even though these artifacts are accentuated by the narrower angle of view of the 90mm.
+++
11. Perspective and Focal-Length Personality
These tests reveal the quality of perspective as modulated by camera distance. In optics, perspective describes the transformation of imaged objects with focal length and distance. Another way of saying this is that perspective describes the way a lens renders space, with an impact on:
- how parallel lines are rendered
- the magnification of background elements
- the appearance of depth in the image
- the portraiture of the face
To me, angle of view and perspective define the “personality” of a focal length — what makes, say, a 24mm different from a 90mm. As noted above, you really need to see the camera move, or people move within the frame, to get a full appreciation of how a lens renders space.
+++
12. The 24mm Personality
")
In order to emphasize the “personality” of the 24mm lens, we started on the 36x20 large format just 15” away from Marion
As we move to 5’ with this wide-angle lens, the shape and look of Marion’s face is transformed.
This highlights how each focal length has its own way of rendering a face, and how its depiction of space and its portraiture can be radical at short distances.
(click image for larger size)![]()
+++
13. Conclusions
Briefly, our conclusions from these tests are:
A. At the same distance, larger formats imply longer lenses and therefore less depth of field.
B. At the same distance, large and small formats will offer similar compositions if you adjust focal length.
C. Changing camera distance while matching the foreground field of view will change the image perspective, and in particular background magnification and the apparent depth of the space in the frame.
D. Therefore the camera distance to subject is key to the perspective of the image.
+++
Thanks
Thanks to ASC associate Dan Sasaki, vice president of optical engineering at Panavision, for his keen insights; Dan has worked with me on Panavision white papers that I have written about related topics.
Thanks to Andrew Young at Panavision.
Thanks also to Markus Förderer, BVK; Edu Grau; and Ellen Kuras, ASC, who participated in a Panavision workshop that I organized during the 2015 edition of Camerimage, with similar themes of format comparisons.
Thanks too to Gerhard Baier, Rainer Hercher and Tommaso Vergallo from CW Sonderoptic, for the loan of a Leica SL and 24-90mm zoom lens for the tests.
A special thanks to Pierre-Hugues Galien, Marion Delahousse and Kevin Felix-Lassa.
+++
LINKS
Pierre-Hugues Galien
Siew Ying Chong
3IS film school
formats
blog.abelcine.com: 35mm Digital Sensors - Relative Fields of View in 16x9 -pdf
aarirental.com: Arri Format Guide -pdf
wikipedia.org: List of VistaVision films
CW Sonderoptic web site
Leica
en.leica-camera.com: Leica SL
en.leica-camera.com: Vario-Elmarit-SL 24-90 mm f/2.8-4 zoom lens
Panavision white papers on Primo 70s and optics
+++
THEFILMBOOK - PRACTICAL OPTICS
Practical Optics 1 - Testing Different Sensor Sizes
Practical Optics 2 - Notes on Lenses & Elastic Formats
Practical Optics 3 - Introduction to Anamorphic
Practical Optics 4 - Anamorphic Video Examples
+++
Test photos & other illustrations © Benjamin B 2016
You may use images on the web, but only if you use the above copyright credit and link back to this post, all other uses are restricted by copyright.
+++