The Generic Lens Test
Testing of this kind — which is adaptable to many different types of equipment — is part of how you build your mental Rolodex of tools.

The Importance of Testing
The process of testing is a major component of the cinematographer’s trade. It is a neverending task of examining the latest equipment and revisiting older tools with a fresh perspective.
In most cases, there are two types of tests: generic and specific. One provides an overall evaluation of a new tool (new to the marketplace or new to you) and the other identifies a specific creative or technical application for a project.
This installment of Shot Craft discusses a generic lens evaluation that you may use when you are trying to understand a lens’ characteristics and performance. This approach familiarizes the tester with the attributes of a particular lens, agnostic of any specific application for a project. Testing of this kind — which is adaptable to many different types of equipment — is part of how you build your mental Rolodex of tools you can refer to when needed, because you have a better understanding of how those tools work and how they may be applied to solve a problem or realize a creative vision.
Many cinematographers at the beginning of their career are intimidated by testing and often lament that they don’t have access to the required equipment due to their typically low budgets. But nearly every equipment rental facility will allow a cinematographer to come in and test equipment on their premises. It’s the nature of the business, and it helps them meet potential clients. It may not be possible to test if your local rental house is busy or the equipment is rented to another project, but if they’re having a slow day, they typically won’t refuse a test request. It doesn’t cost you anything but time.
Some cinematographers approach testing by simply trying out the equipment — taking it into the field and shooting something, or examining it at the rental house. While this approach can teach you something about the new tool, a more scientific and methodical approach will reveal exponentially more. There’s little use, for example, in merely taking a lens out to shoot a sunset or a model if you’re not testing variations in each shoot — to learn the different characteristics of performance along the range of the lens. When testing any piece of equipment, you should have a plan for what you want to learn. You can get in a car and testdrive it around the block, but that won’t tell you how the car will perform on the freeway, or how the brakes will perform in an emergency. If you really want to test that car, you’ve got to spend some time testing it with a variety of specific tasks.
This cannot be stressed enough: Take copious notes, detail everything you do in your testing, and err on the side of creating more ridiculously detailed notes than you might ever need.
The Generic Approach
When you’re performing a generic/agnostic test — on any piece of equipment — it’s critical to take as scientific an approach as possible. While the “scientific method” involves the formulation and testing of hypotheses, a variation of this strategy is recommended. A cinematographer should not go into a test with a preconceived notion of how the tool might perform, but should instead begin testing with questions: What is the dynamic range of this camera? How well is this lens corrected for spherical aberration? What is the usable viewing angle of this monitor? How accurate is the color fidelity of this light fixture?
Having specific questions enables you to perform specialized tasks to find those answers.
Note Everything
This cannot be stressed enough: Take copious notes, detail everything you do in your testing, and err on the side of creating more ridiculously detailed notes than you might ever need.
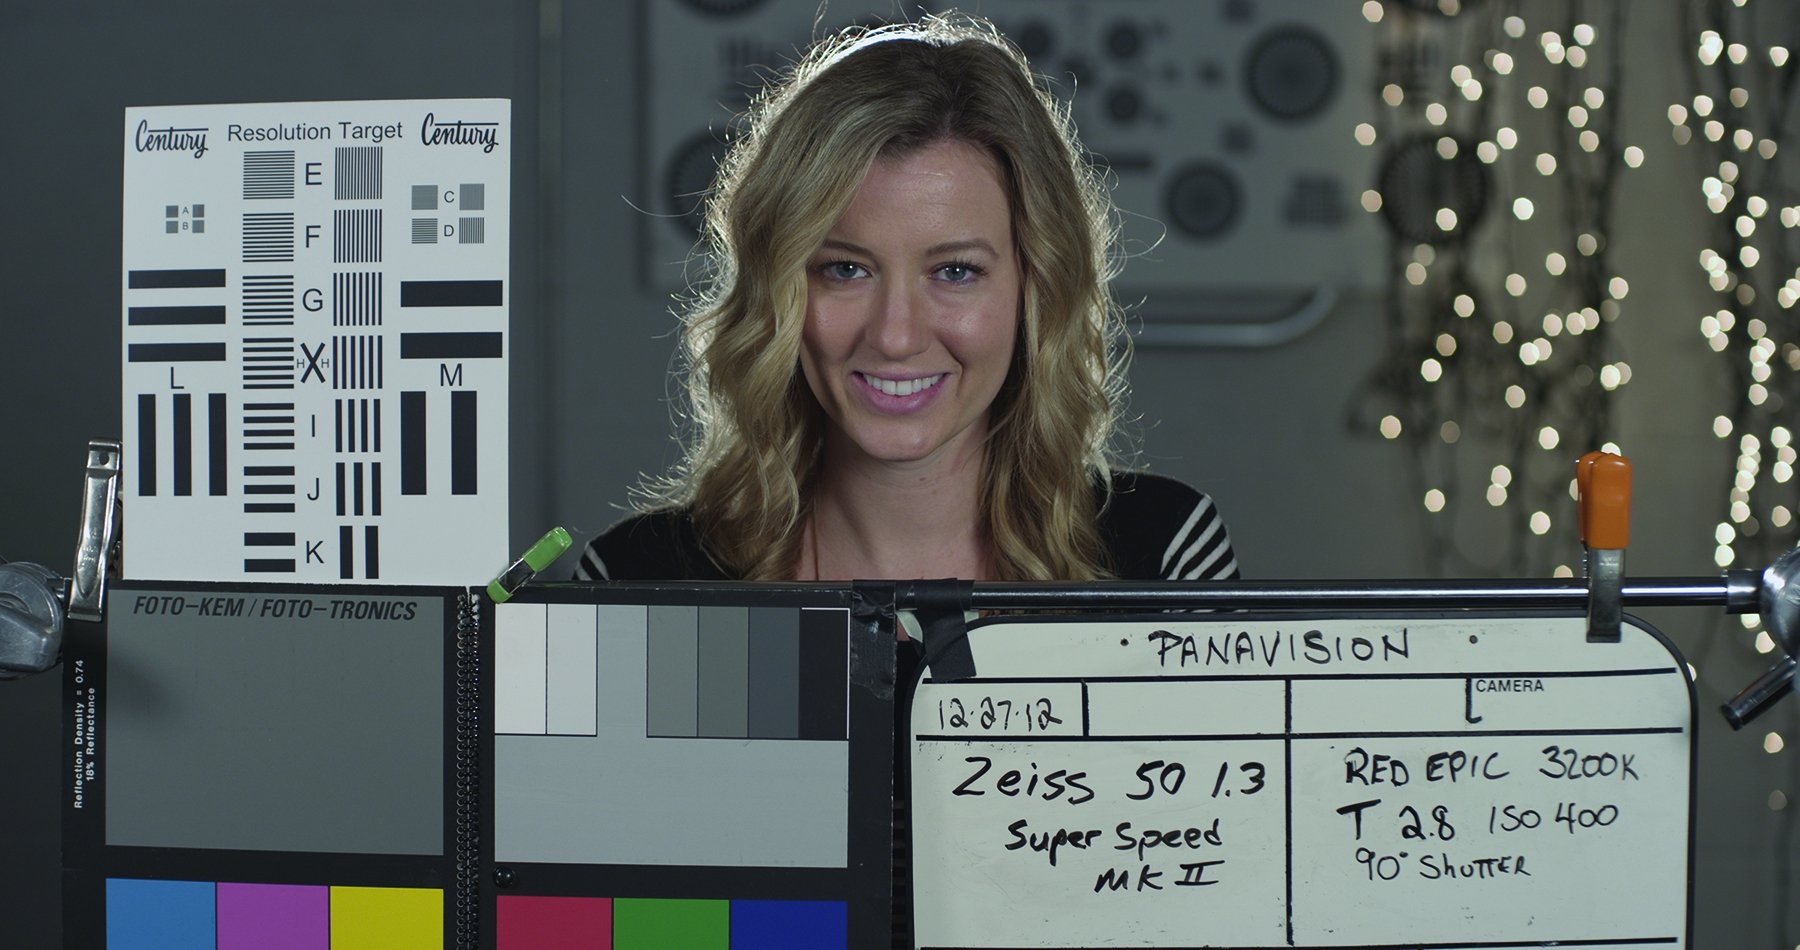
You might also consider including the notes in the frame when testing a camera, lighting or a lens. This can generally be accomplished with a slate in the shot, or even Post-It notes attached to elements in the shot. Taking such steps ensures that the information never gets separated. A slate at the top of a clip is helpful (and in some cases the only choice), but that doesn’t follow through if you cut the footage or take still frames later.
Detailed written notes are crucial. They’re tedious and time-consuming, but they should be done. Never, ever think, “I’ll remember this later.” You won’t.
Think Long-Term
While you can learn a great deal just by performing the test and looking at the results in the moment, it is beyond invaluable to examine the results after the fact. Even just the following night or a day later, you can spend more time scrutinizing the results and comparing them side-by-side. It can be especially useful to compare frame grabs of different iterations of the test. This is also where detailed note-taking becomes crucial. While reviewing the test immediately after doing it is helpful, you may need to refer to this test a week, a month or even a year later.
Step-By-Step
After performing innumerable lens tests in my career, and especially in the last decade, I’ve established a generic test that incorporates a number of easily isolated variables in a single frame to economize time and maximize the number of lens attributes that are being examined. Each iteration of the test looks at these attributes at a different aperture.
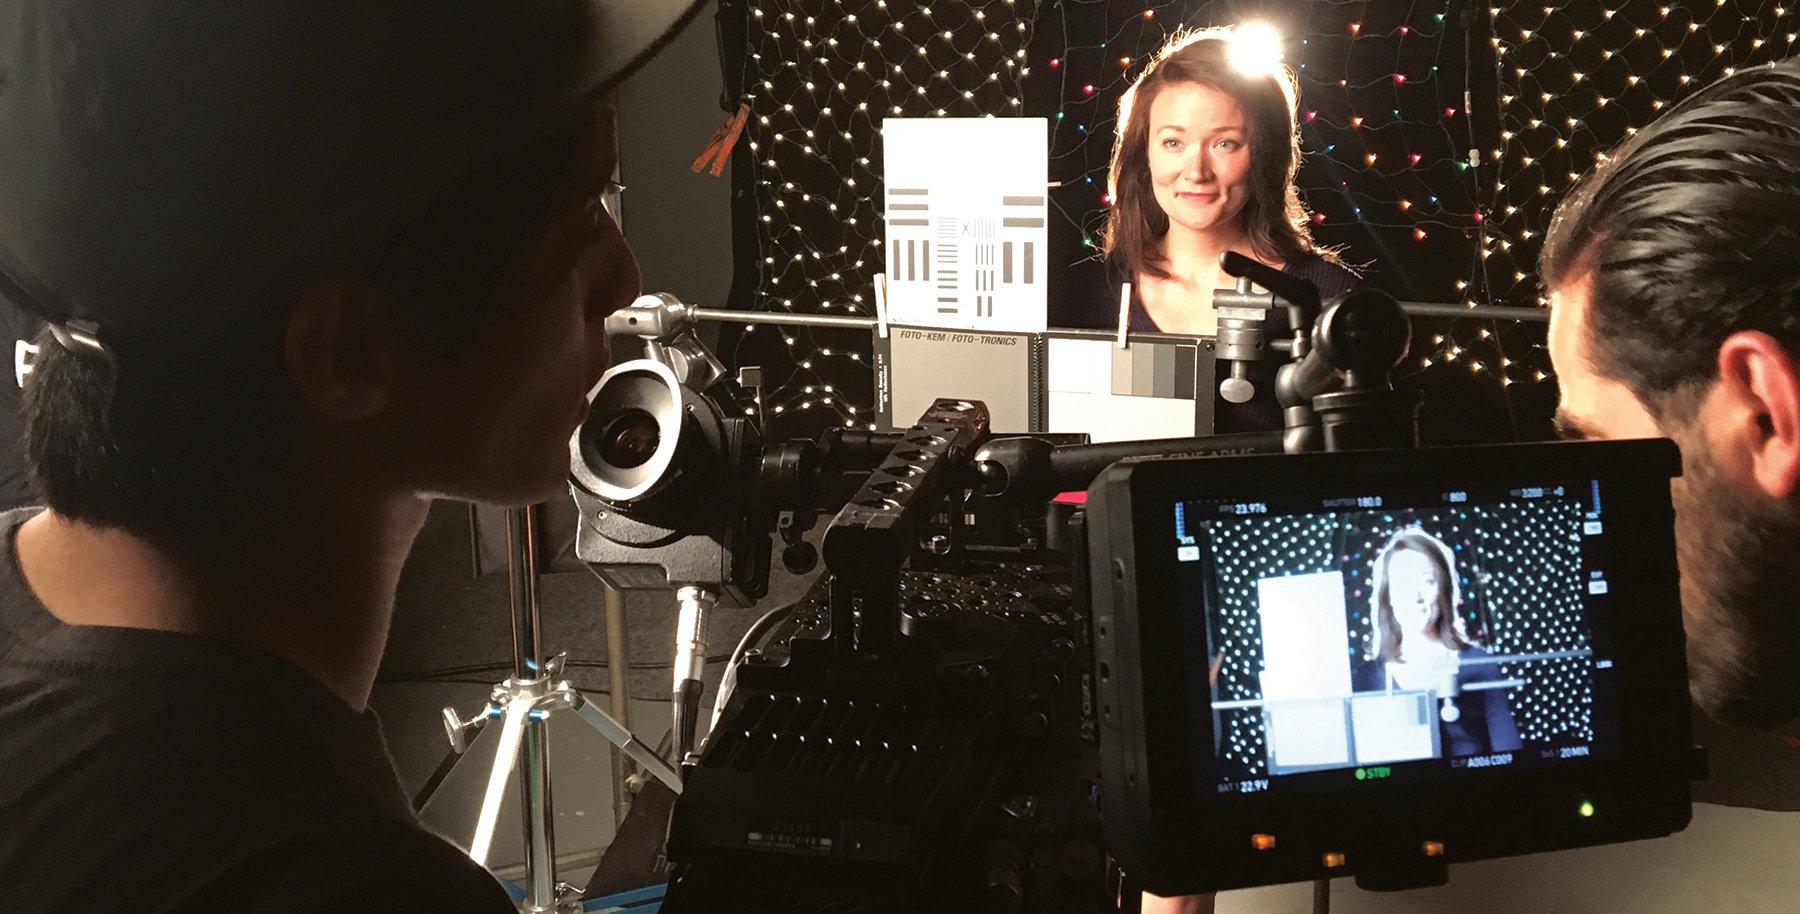
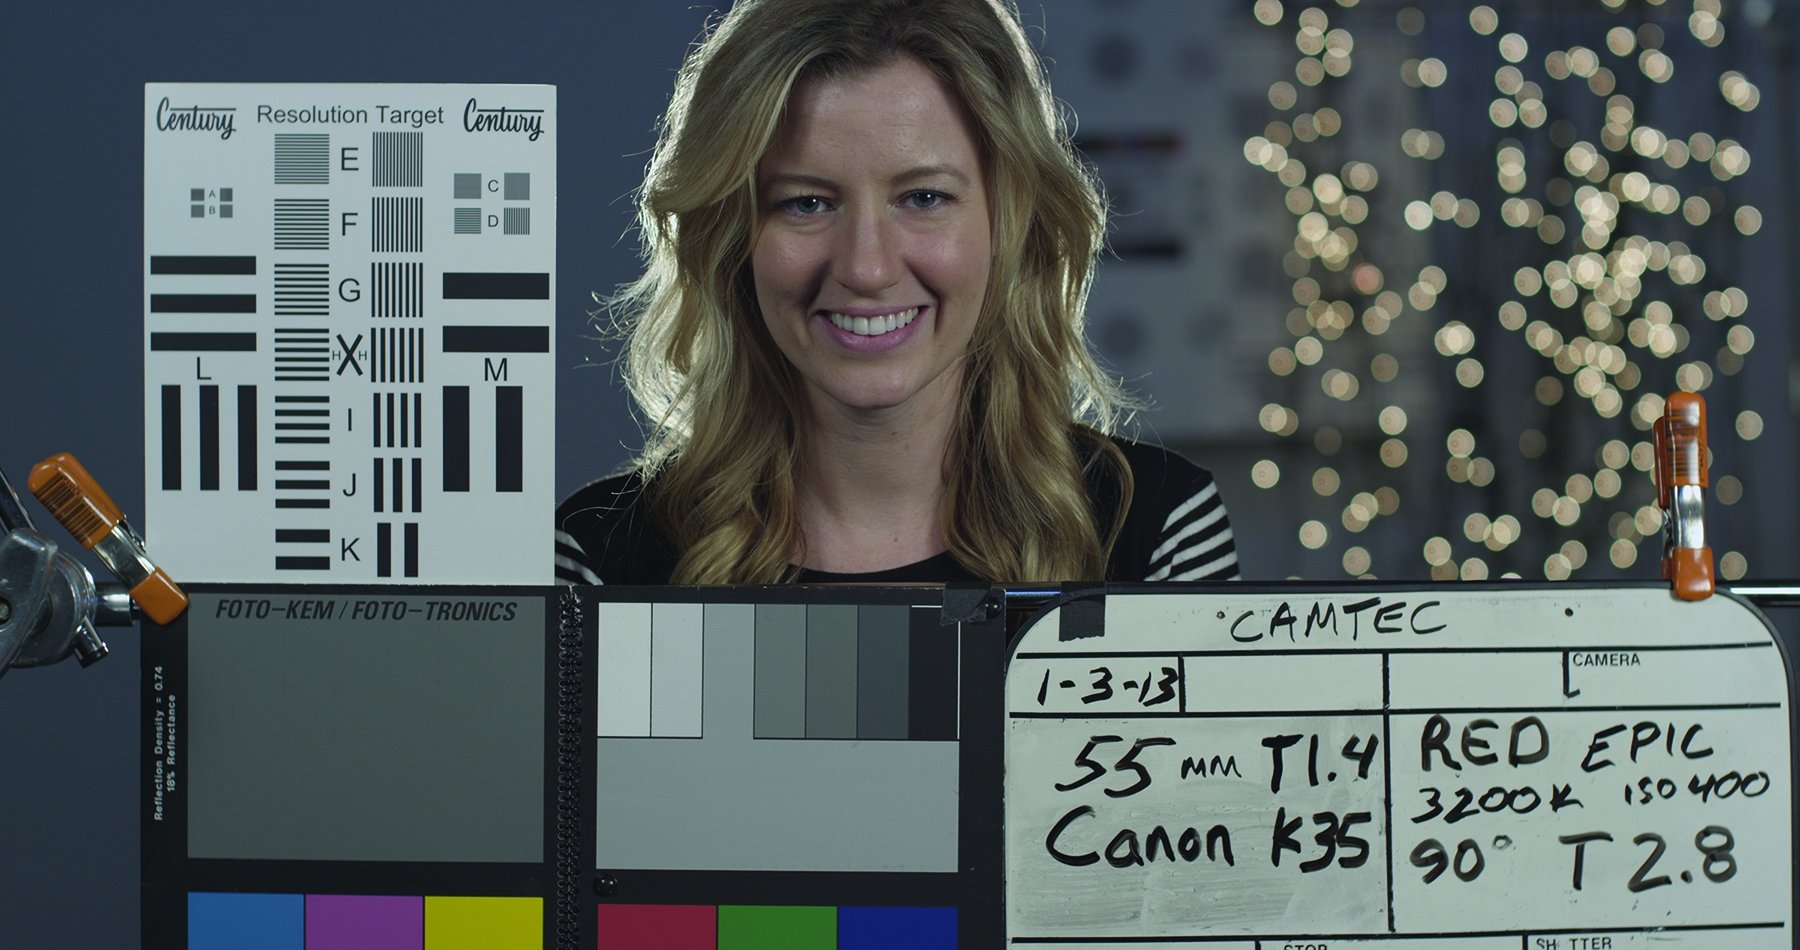
The test starts with a model. Since human faces are a key focus for cinematographers, it’s good to have one in frame.
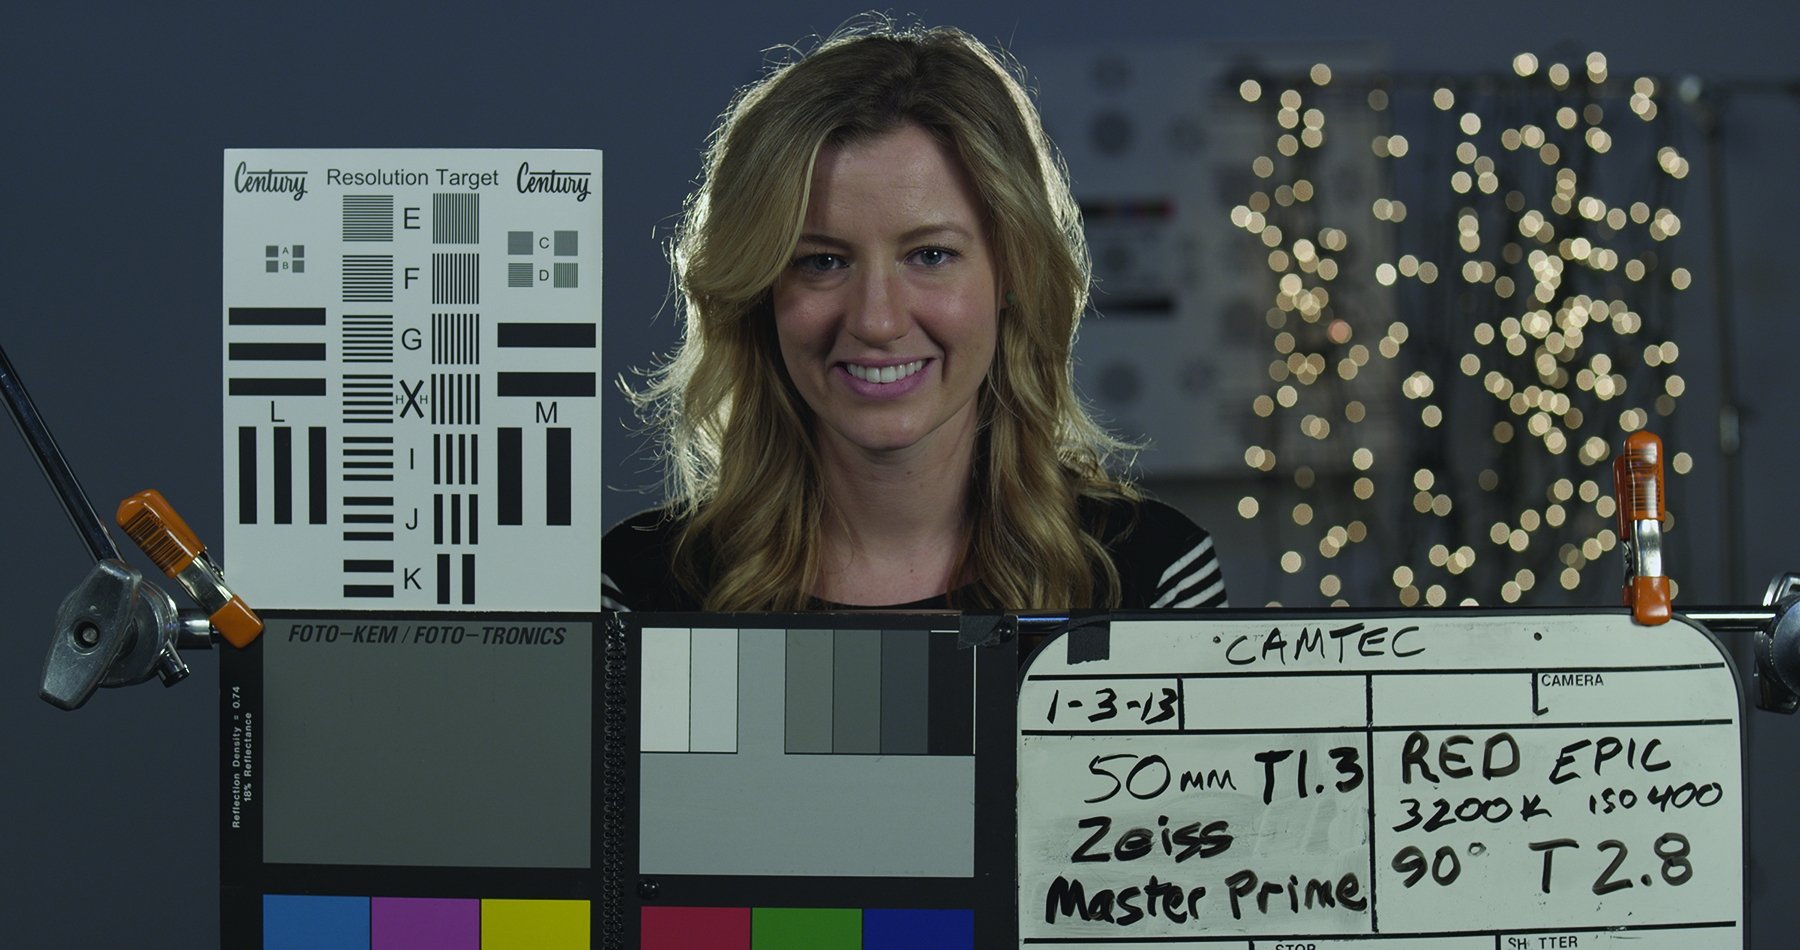
In front of the model, I’ll use one arm of an 8'x8' frame, securing it on both ends with C-stands. This provides a place to put a slate, gray card, color chart and resolution card. All of these get grip-clipped to the square tube of the frame arm, and the model sits directly behind them so that the cards align with the plane of the model’s face.

Behind the model, stretch out a large piece of duvetyne or a 20x solid across the back wall. These should be a fair distance away from the model — about 6'-10'. In front of the black, basically right on top of it, stretch three or four nets of holiday twinkle lights. Ideally, the black and twinkle lights should span the entire field of view of the lens you’re testing, allowing for enough width for the widest lens that will be tested.
It’s absolutely crucial to use tungsten filament holiday lights — not LEDs, which will cause flicker problems as you change shutter angle. I also prefer to use the “net” variety of these lights, which are designed to drape over bushes, as you’ll get a 4'x6' area of lights in a single unit and you can easily cover the entire field of view of most lenses with just a couple of nets. Many times you’ll see individuals using a single strand of holiday lights somewhere in the frame, but I prefer them to cover the entire frame; the nature of the lens’ bokeh changes from the center to the edges, and the holiday lights will reveal this instantly.
Then place a 150-watt Fresnel in front of the holiday lights, off to one side near the top of the frame, but still in the shot. This lamp should be pointed directly at the lens, in order to reveal how the lens will handle spot/ghosting flare. It will be switched on and off during the test. Ad-ditionally, another 150-watt Fresnel is positioned just outside the field of view of the lens, off to one side. Both of these lamps are cabled back to switches near the camera.
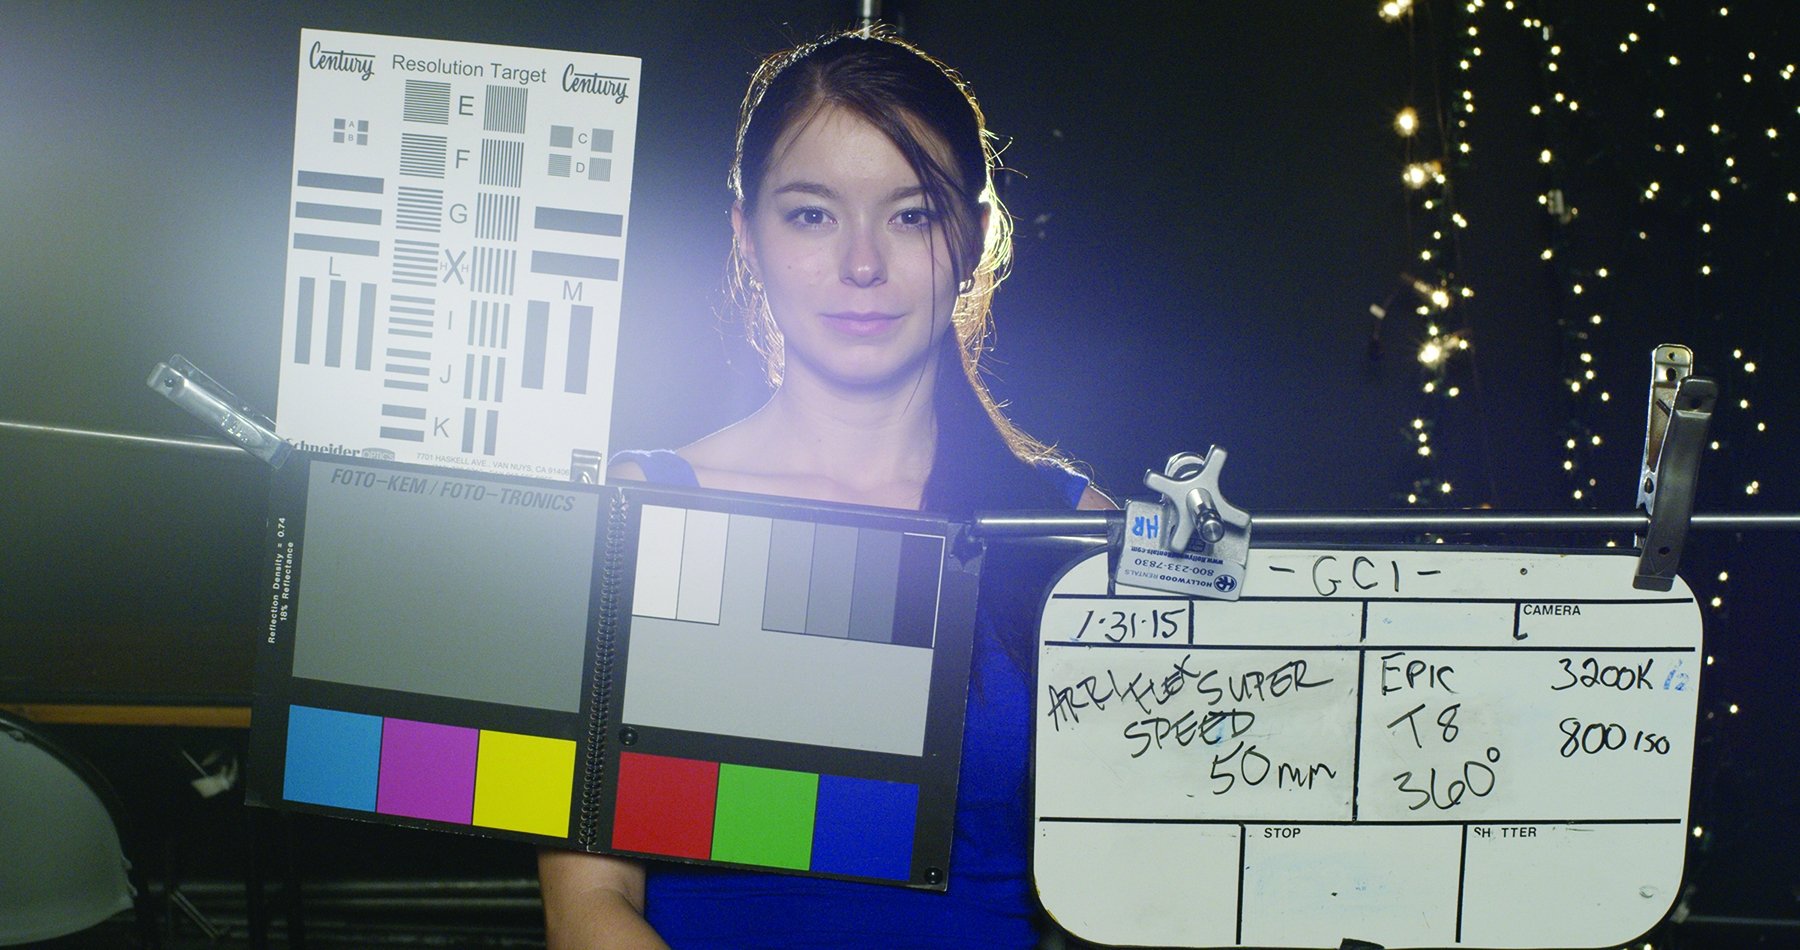
I generally choose a large, broad light as a key source to evenly illuminate the charts and the model. This shot isn’t about creativity in lighting — it’s a technical test. The fixture can be any kind of your choice, but it should be soft, it should evenly light the model and all the charts, and it should provide a minimum of 50fc (538 lux) of illumination on the model’s face and the charts (that’s a 5.6 at 800 ISO at 24 fps).
Focus is set on the model with the lens at its widest aperture and is not changed during the main body of the test. If you set focus with the lens at any deeper stop, it’s possible you will not have critical focus on the model, as depth of field makes it difficult to see the critical-focus plane; then when you open up the aperture, the model may be soft, which will bias the test. Once the focus is set, don’t refocus for each iteration, since that can also bias the test.
During each iteration:
• Start rolling with only the key light and holiday lights on.
• Turn on the rear flare light, directly striking the lens at an oblique angle. It remains on for a second or two and then is turned off.
• Turn on the side (veiling) flare light, striking the lens from out of frame. It remains on for a few seconds and then is turned off.
• The camera cuts.
• Change the iris.
• Change shutter speed and frame rate accordingly.
• Change the slate.
During the final iteration, before you cut, roll from close focus to infinity to check focus breathing. This tactic is generally best kept to the end of the process so that focus variation between iterations is not a factor.
Testing a lens at multiple stops is essential because the behavior of many aberrations changes at different iris settings. I prefer to test a lens at every stop to gain as much information as possible, but that method can be tedious and time-consuming if you know you’ll only be using the lens within a particular range of stops.
Note that after each iteration, you change the iris as well as the shutter angle and/or frame rate.
When the aperture changes, we must compensate for the difference in exposure by adjusting other variables to maintain consistent exposure. Altering the lighting can bias the results of the test, and it can cause inconsistencies. You therefore do not want to introduce any scrims, nets or gels, or any dimming of the lights. (LED lights can be dimmed, but this can still introduce inconsistent results, since the dimming is not always precise). Likewise, you also don’t want to add any form of filtration on the lens or behind it, because additional glass can add aberrations that are not in the lens. You should not alter the camera’s ISO settings, either, since this can add noise and affect the resolution of the image — and possibly bias the results. The idea is to eliminate as many variables in the test iterations as possible, except what you’re examining.
Instead, you’re best served by adopting an exposure-compensation methodology that does not adversely affect any parameters of the lens. Personally, I have found that altering the shutter angle and/or frame rate is best for this test when the model remains stationary.
My protocol for exposures:
• The key light is lit to a level of T5.6 at 800 ISO at 24 fps (about 50fc).
• Exposure variations will be handled through changes in shutter angle and frame rates only, which you can apply based on this chart:
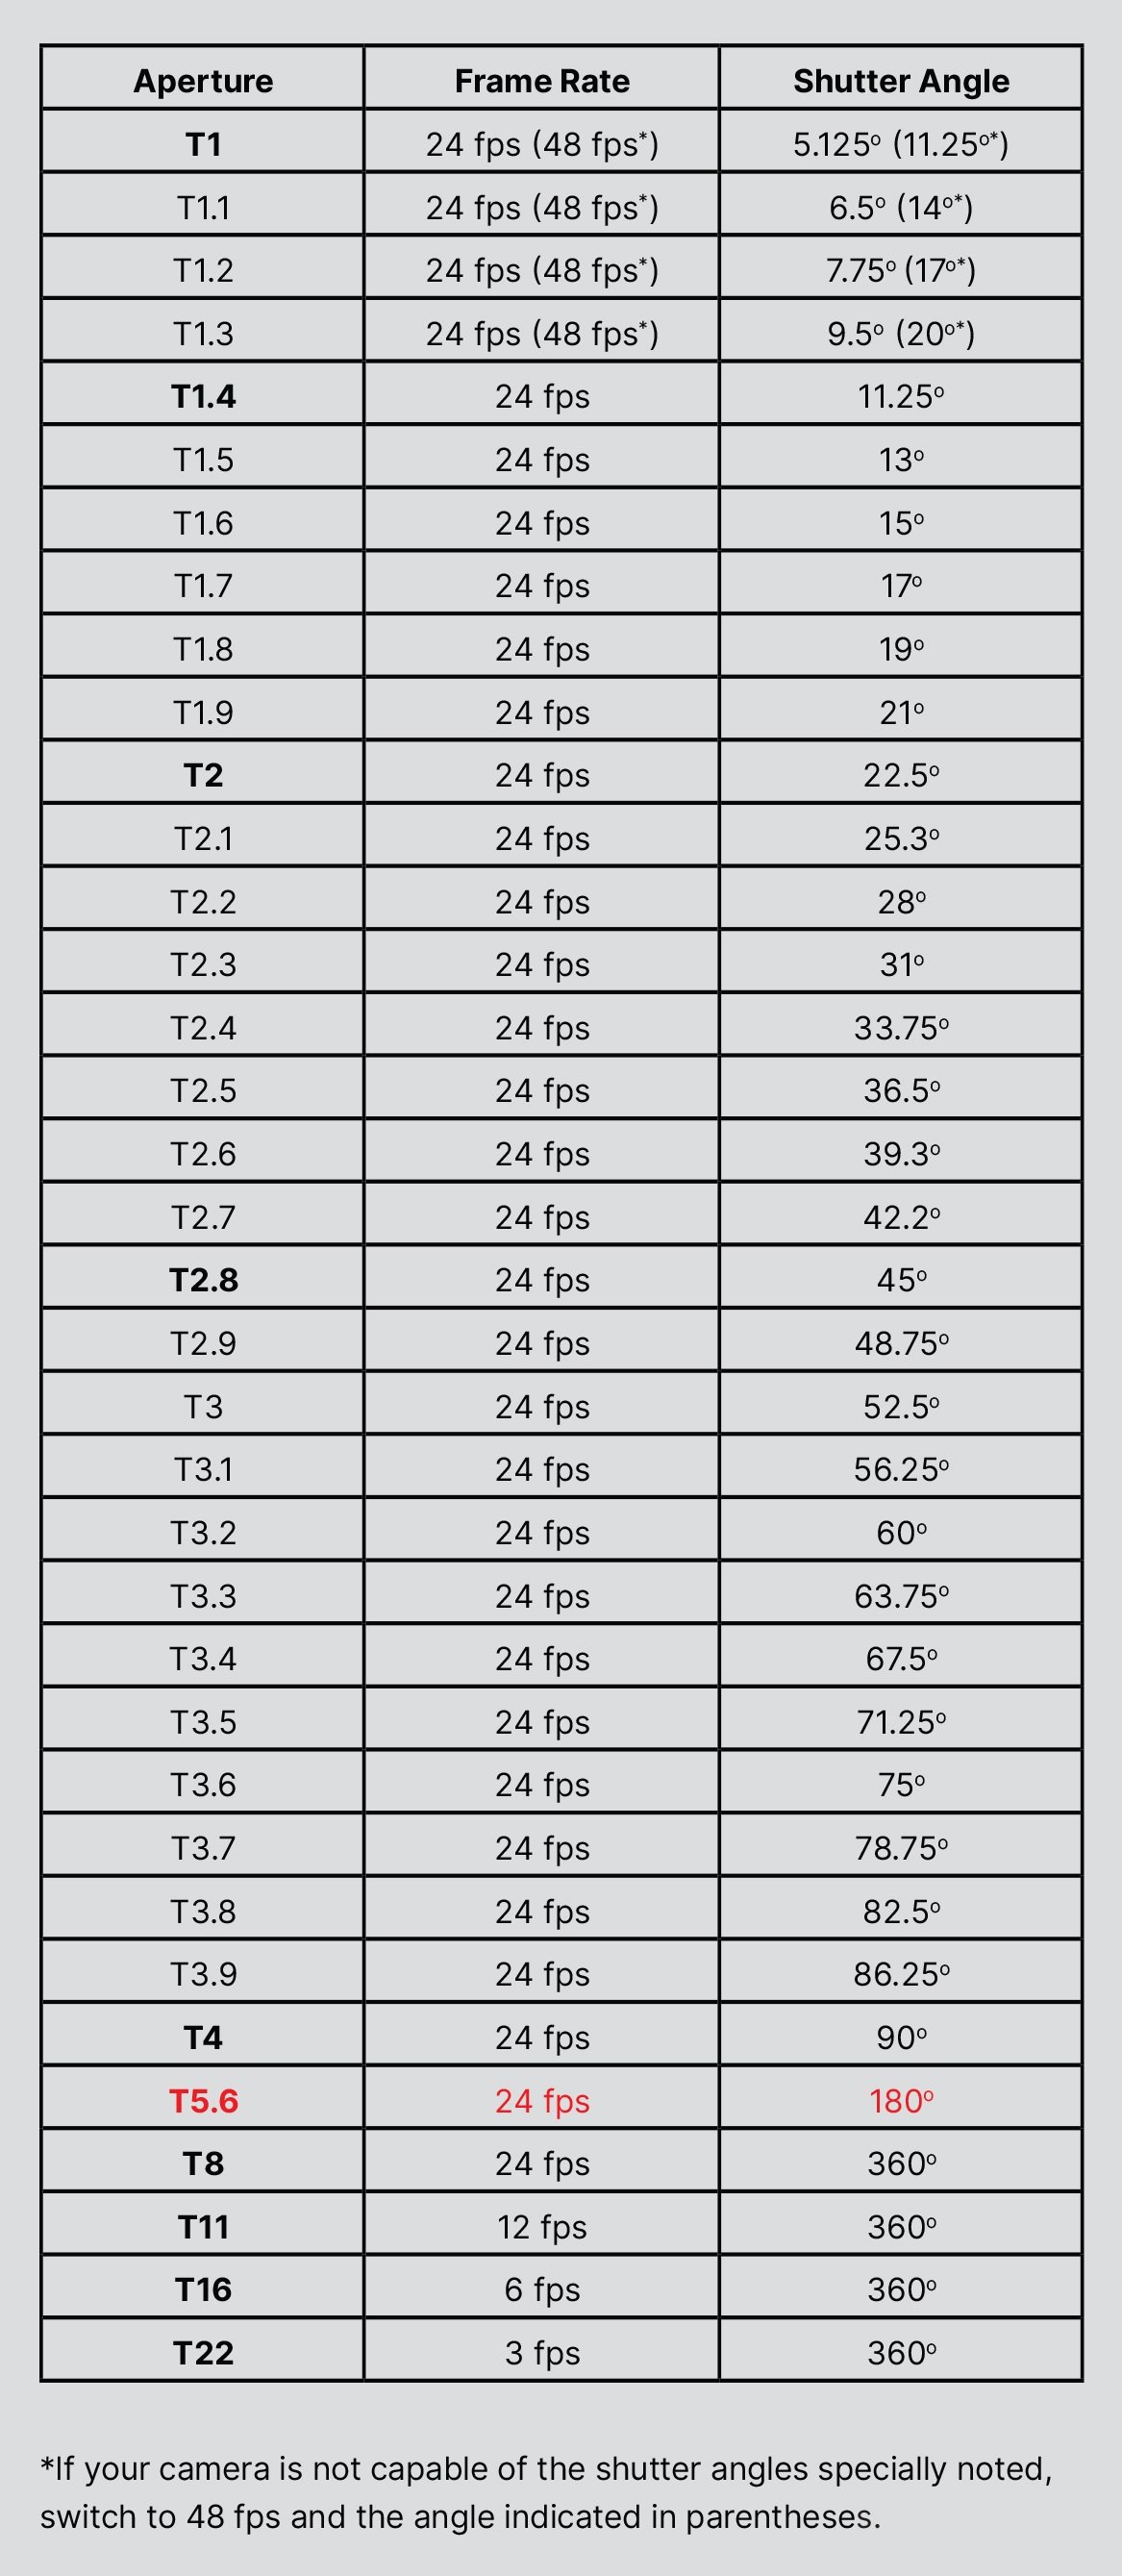
This chart is provided as a guideline for exposure compensation via shutter angle and frame rate, with a base starting at T5.6, with a 180-degree shutter at 24 fps (noted in red). This base is chosen so that you may reach all of the common stops on most lenses without altering lighting. Bolded apertures are full common stops; non-bolded are frac-tional stops, allowing for lenses whose maximum speed is a fractional stop (i.e., T1.3 or T1.9 as opposed to T1.4 or T2). When testing on some cameras, not all of these shutter angles or frame rates may be possible. In those circumstances, you may need to compensate exposure via lighting.
On the chart, note that when you change frame rate, the duration of time and speed of movement also changes. If you switch to 12 fps, you should roll for twice as long at each stage of the test — including the length of time that you turn on your spot-flare and veiling-glare lamps. When you switch to 6 fps, you need to roll for four times as long. Inversely, if you switch to 48 fps, you should roll for half the amount of time.
For zoom lenses, at the very minimum, you should test the widest and longest focal lengths possible within the testing environment, along with one or two positions between those points. For the most exacting results, test the zoom lens at every marked focal length on the barrel.
Best Practices
The generic lens-testing setup described here provides a great deal of information overall: how the lens handles skin tones; the sense of dimensionality it presents; the bokeh, color and sharpness it produces; and how the glass handles flares. It’s a lot of information packed into a single frame.
It’s always best to test more than one lens. If you’re only interested in the performance of one lens, pick another that you know well to compare it to, or one that’s generally considered to be a high-performance professional lens.
It’s also important to note that lens characteristics differ when shooting film versus digital, and when shooting with one particular digital camera versus another. It’s best to test with a camera that you will be using — or if you’re inclined to add iterations to your testing, you can use multiple cameras and widen your knowledge base.
Future installments of Shot Craft will discuss additional methodologies for camera and lighting tests:
Specified Lens Tests
Looking at more specified testing techniques that examine particular characteristics of a given lens.