Shot Craft: Follow the Sun
Cinematographers working in independent film must learn to make the most of limitations — limited funds, limited time, limited gear and limited crew — in order to realize the director’s vision.
Fortunately, the world is teeming with free natural light. But do you really know how to harness it and shape it to your needs?
Tracking: The Earth Goes Round and Round
We all know the sun rises in the east and sets in the west. Cinematographers must also understand that in North America, the sun peaks higher in a summer sky and lower in a winter sky. You must also know the angle at which sunlight will hit your location every hour of the day you’ll be there. Will the sun streak through the windows at dawn or dusk? Or maybe not at all?
In the most basic terms, if windows face east, then sunlight will shine directly into them in the morning; if windows face west, the late-afternoon sun will shine in; if they face north, you won’t ever get direct light through them at any time of day; and if they face south and it’s summer, you probably won’t see any direct light (depending on the location’s latitude), whereas in winter, you could have some type of direct light all day long.
One of the first things you’ll do when you learn of a location — even before the scout — is look it up on Google Maps and find out the location’s orientation to the sun. Then, when you scout, take a compass. (You can download a basic compass app on your phone.) Maybe the director wants streaking sunlight through the large picture windows, but you check the compass and find out the windows face north. The only way to have sunlight streak through is to create a setup for redirecting the light (or find another location).
You should also get accustomed to thinking in compass directions if you don’t already.
Any gel you use on a mirror will be double its strength because the light passes through the gel twice — so, a ½ CTO filter on a mirror will have the effect of a Full CTO.


Sunrise and Sunset Drift
The length of day and night differ depending on your distance from the equator, and sunrise and sunset times change from one day to the next. North of the equator, sunrise gets progressively earlier every day beginning Dec. 21 (winter solstice) until June 21 (summer solstice), then gets later every morning until Dec. 21. Respectively, sunset gets progressively later each day from December to June, then earlier, between the solstices. This makes June 21 the longest period of daylight and Dec. 21 the shortest.
When you’re south of the equator — in Australia, for example — those dates flip. Summer solstice is in December and winter is in June, so from June to December, your days get longer. Near the North and South Poles, things are a lot different; the internet is packed with sun-tracking information resources.
It’s up to you to work with the sun and its movement to maintain continuity of look.

Relentless Movement
The sun’s constant movement through the sky over the course of a day can be one of the biggest impediments to shooting with natural daylight — and it’s up to you to work with the sun and its movement, to plan out your day so you can follow the movement of the sun with your shots and coverage and maintain continuity of look. Fortunately, the sun’s movement is consistent and predictable.
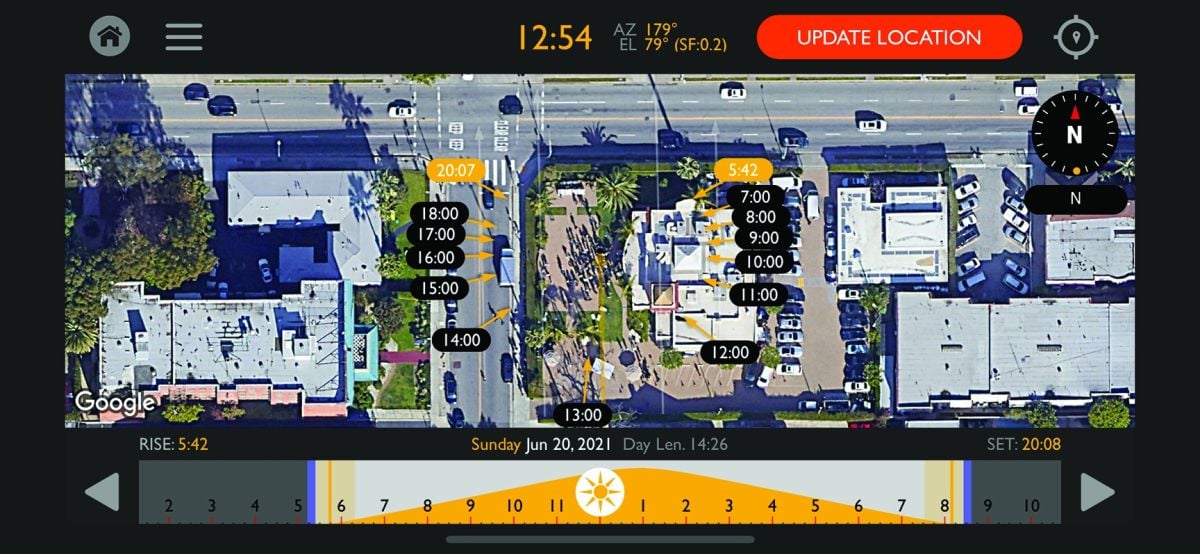
The sun moves across the sky ¼ degree per minute. Using a sun-tracking app, you can predict where the sun will be at any moment of any day, even years in advance. I use Chemical Wedding’s Helios app, which was designed for cinematographers, but there are others, including some free ones.
If you don’t have a sun-tracking app on your phone, get one now.
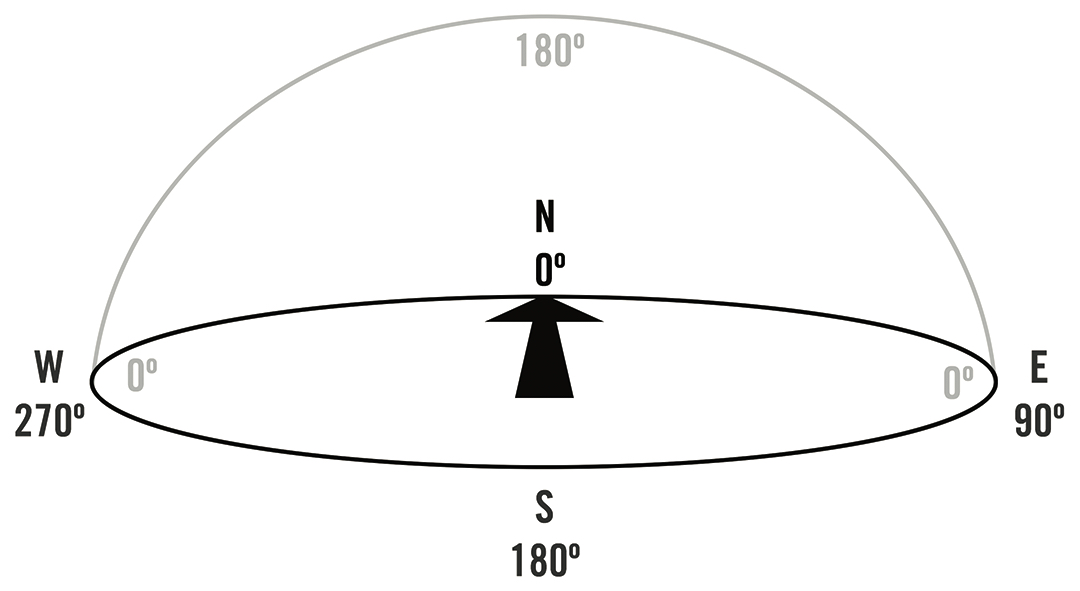
There are two independent measurements for sun position: its compass heading and its “height” (or azimuth) in the sky. The compass heading is divided mathematically into 360 degrees with due north being zero, east 90 degrees, south 180 and west 270. The azimuth angle is a 180-degree arc from horizon to horizon. Ninety degrees azimuth is straight up and 0 degrees is the horizon at sea level. You should have a compass with a clinometer, which allows you to sight a particular azimuth. I have a clinometer app that allows me to sight along the side of my phone, and it will tell me what azimuth I’m looking at.
Armed with this information and these tools, you can determine exactly where the sun will be at any moment. You’ll know that it will pass behind a building at your camera position at exactly 5:20 p.m. and peek back out at 5:47 p.m.
There is also a way to estimate this without the fancy tools. Since the sun moves 1/4 degree per minute, that translates into 3.75 degrees every 15 minutes and 15 degrees every hour. As it turns out, the width of your finger when it’s extended arm’s length from your eye subtends about 3.75 degrees on your eye (i.e., your finger’s width, from your perspective, appears to take up approximately 3.75 degrees of the arc within your field of view). So, the width of your finger approximates how much the sun will move in 15 minutes, and the width of four fingers side-by-side approximates how much it will move in an hour.
Of course, you shouldn’t look directly at the sun. You can glance at it through welding glass or a heavy-contrast viewing filter — though you still need to be quite careful, as these generally do not filter out all of the UV radiation, which can do much damage to your eyes. Both of these tools are also great for cloud-watching (as they do filter out quite a bit of the harmful radiation of indirect sunlight, though you should still be cautious), so you can estimate when moving clouds might cover or uncover the sun.
Harnessing the Sun
Indirect natural light can also be your friend. Open shade — where the sun is blocked but you still have plenty of ambient light — can be the most beautiful soft and directionless light. Knowing when the sun will be on the opposite side of a building, you can place your shooting area in open shade. This is a simple way to achieve an elegant look.
Reflectors, bounce cards or boards and mirrors are phenomenal tools for working with daylight. Even if you’re shooting interiors, bounce material outside the windows can help extend natural daylight into the location. Northern-exposure windows might never get direct sunlight, but the area outside the windows may be in direct light all day. Judiciously placed reflectors or bounce material can redirect that light into your location fairly consistently throughout the day as long as your grips move the tools in tandem with the sun. I’m a big fan of mirrors because they allow me to reflect hard, direct sunlight wherever I want it — though the struggle is that mirrors must be closely monitored and adjusted all day long as the sun moves. A more diffuse reflector doesn’t require such constant monitoring.
Shiny boards, mirrors, beadboard, foamcore, muslin, Grid Cloth and Ultrabounce are all excellent tools for bouncing or reflecting sunlight.
Magic Sun Theory
Though there are no steadfast rules about how to shoot in sunlight, many cinematographers prefer to position their shots so the sun will backlight their subjects. So, if you’re shooting in the early morning, your talent would be facing west (away from the sun), and in the late afternoon, they would face east. Light around noon in summer can be the harshest because it’s directly overhead, giving the talent deep eye-socket shadows and chin shadows.
Therefore, cinematographers will often “chase” the sun, keeping the talent backlit all day long by rotating the camera position to face the sun. (Your talent will also thank you for this because they’ll be squinting less.) At the height of the day, soft silks overhead can diffuse the harsh sunlight, and adding reflector bounces behind the talent can continue the look of natural backlight.
But what happens when you have two characters facing each other? What if it’s a gunfight at sunrise?
Let’s say you’re shooting a scene in which two cowboys square off on Main Street. This means one character can be backlit by the sun, but the other will be front-lit. Many cinematographers would shoot it this way because it’s realistic, but it’s not necessarily the best look. In fact, it can be jarring and even visually uncomfortable to have one character in lovely backlight and the other in harsh frontal light — it doesn’t feel right.
A more refined look is to have both characters backlit. Amazingly, this looks right to the audience. Because both characters are in the same quality and type of light, the audience doesn’t question it. This is known as the Magic Sun Theory: The sun “magically” moves where the cinematographer wants it to be, even within a single scene.
Using this theory, you can shoot one cowboy and all angles facing him in the morning, with the early sun backlighting him, and then shoot the other cowboy in the afternoon, with backlight now positioned just right from this new position. As much as this might feel like a continuity cheat, it’s the consistent quality of light on the actors that makes this look and feel right.
Softening the Sun
Using overhead silks or diffusion (Grid Cloth, Silent Frost, Silk, etc.) to soften direct sunlight can create a problem in your background: The light on your subject has a nice soft quality, but it’s a lower exposure because some light is lost to the diffusion, so the background is receiving hard, hotter light. Depending on your shot size, depth of field, and the movement of the camera, you may be able to incorporate a single or double net in the background behind the talent to help take down the intensity of the background a bit. This is placed in shot. If it’s just slightly out of focus, beyond the depth of field, the net will disappear and merely act as a large ND filter for the background. I’ve always carried 20'x20' single and double nets for this purpose.
Interiors With Natural Light
When shooting interiors, sometimes there isn’t enough daylight to get good exposure, or you need to balance the exposure of the inside with the exterior light visible through the windows, and you must add light. If you have bi-color LED fixtures or daylight color-balanced lighting, great! But the independent cinematographer is often limited to the least expensive fixtures available, and that’s typically tungsten. A 2K is the largest fixture you can safely plug into a standard outlet, and you might think you can use CTB gel on a 2K tungsten fixture to color-balance it for daylight. However, when you do that, you cut the light’s output by 25 percent (2 stops less). You’re already using a weaker tungsten light to counteract bright light from outside the windows, and now you’re turning your 2K into a 500-watt. That isn’t going to work.
The better bet is to gel the windows with CTO, which converts the daylight to tungsten color balance. This will also knock down the light outside the windows by 2/3 of a stop, helping further.
That doesn’t stop you from using mirrors or reflectors outside to push light into the room, but now, if you must use tungsten fixtures inside, you can use them at full power and have more light to counteract the brightness outside.
One last tip: I’ve sometimes put CTO or CTB on a mirror to bias the color of reflected light coming into a room. Maybe I want to warm up the reflected hard mirror light against the cooler ambient daylight to have warm sunset streaks. If you do this, just remember that any gel you use will be double its strength because it affects the light color (and light intensity) twice; the light passes through the gel once before it hits the mirror, and then it bounces off the mirror and bounces back through the gel again. So, a ½ CTO filter on a mirror will have the effect of a Full CTO.
Worthy Challenge
I’ve often said that one of the hardest jobs for a cinematographer is the daylight exterior. That might sound strange, but maintaining a consistent look over the course of a day or even days requires every tool in the cinematographer’s arsenal. Spending a full day (or two or three days) shooting a day-exterior sequence that will only last a moment onscreen can be some of the most challenging work you’ll ever do. Take a deep breath, plan out your day, and hope that Mother Nature is on your side.
Jay Holben is an ASC associate member and AC’s technical editor.